To create an AWS account with a credit card, visit the AWS website and click “Create an AWS Account.” Then, follow the prompts to enter your credit card information and complete the registration process.
Creating an AWS account with a credit card is a straightforward process that allows you to access Amazon Web Services’ cloud computing platform. By following a few simple steps, you can set up an account and begin utilizing the wide range of services and resources offered by AWS.
In this blog, we will guide you through the process of creating an AWS account with your credit card, ensuring that you can get started with AWS quickly and easily. Whether you’re a business looking to leverage cloud computing or an individual interested in exploring AWS services, this guide will provide you with the necessary information to create your account successfully.
Credit: budi.day
Introduction To Aws Account Creation
Learn how to easily create an AWS account using your credit card for seamless access to cloud services. Simplify the process and kickstart your cloud journey hassle-free.
Creating an AWS (Amazon Web Services) account is the first step towards accessing a wide range of cloud computing services offered by Amazon. Whether you are an individual developer, a startup, or an enterprise, having an AWS account allows you to leverage the power of cloud infrastructure to build, deploy, and scale your applications with ease. In this section, we will explore the benefits of having an AWS account and the pre-requisites you need to fulfill before setting up your account.
Benefits Of Having An Aws Account
An AWS account provides numerous benefits that can enhance your cloud computing experience. Here are some key advantages:
- Flexibility: With an AWS account, you have the flexibility to choose from a vast array of services to meet your specific requirements. Whether you need storage, databases, analytics, machine learning, or networking capabilities, AWS offers a comprehensive suite of services to cater to your needs.
- Scalability: AWS enables you to scale your applications seamlessly, allowing you to handle varying workloads efficiently. You can easily adjust your resources up or down based on demand, ensuring optimal performance at all times.
- Cost-Effectiveness: By leveraging AWS services, you can significantly reduce your infrastructure costs. AWS offers a pay-as-you-go model, allowing you to pay only for the resources you consume. This eliminates the need for upfront investments in hardware and infrastructure.
- Reliability: AWS provides a highly reliable and secure infrastructure that is designed to handle even the most demanding workloads. With multiple availability zones and data centers spread across the globe, AWS ensures high availability and fault tolerance for your applications.
- Global Reach: With AWS, you can deploy your applications globally, reaching users in different geographic locations. AWS has a vast network of data centers worldwide, enabling you to serve your customers with low latency and high performance.
Pre-requisites For Account Setup
Before you proceed with creating an AWS account, there are a few pre-requisites you need to fulfill:
- A Valid Email Address: You will need a valid email address to register and receive important notifications related to your AWS account.
- A Credit Card: An active credit card is required to verify your identity during the account setup process. AWS does not charge any fee for signing up, and you will only be billed for the services you use.
- Phone Number: You will need to provide a valid phone number to receive a verification call from AWS during the account setup.
- Basic Knowledge of Cloud Computing: While not mandatory, having a basic understanding of cloud computing concepts will help you make the most out of your AWS account.
By ensuring you have these pre-requisites in place, you will be ready to create your AWS account and start exploring the vast array of services offered by Amazon Web Services.

Credit: www.youtube.com
Step-by-step Guide To Aws Sign-up
Welcome to our step-by-step guide on creating an AWS account with a credit card. This guide will walk you through the process, ensuring a smooth and hassle-free sign-up experience. Below, we provide a detailed breakdown of each step, from navigating to the AWS sign-up page to entering basic information.
Navigating To Aws Sign-up Page
To begin the process, open your web browser and navigate to the AWS sign-up page. You can easily access this page by entering “AWS sign-up” into the search bar or by visiting the official AWS website and locating the sign-up option in the top-right corner of the homepage.
Entering Basic Information
Once you have reached the sign-up page, you will be prompted to enter basic information to create your AWS account. Fill out the required fields with accurate details, including your email address, desired AWS account name, and a secure password. Ensure that the information you provide is correct and up to date to avoid any issues in the future.
Choosing The Right Aws Plan For You
Creating an AWS account with a credit card is a simple process, but choosing the right plan can be overwhelming. AWS offers a variety of plans to suit different business needs, so it’s important to pick the right one for your specific requirements. In this section, we’ll discuss how to determine which AWS plan is right for you.
Free Tier Eligibility
Before choosing an AWS plan, it’s important to check if you’re eligible for the Free Tier. AWS offers a Free Tier for new accounts that provides a limited amount of usage for certain services for up to 12 months. This is a great way to test out AWS without incurring any costs.
Comparing Different Aws Plans
Once you’ve determined your eligibility for the Free Tier, it’s time to compare the different AWS plans. AWS offers four main plans: Basic, Developer, Business, and Enterprise. Each plan offers different features and pricing options, so it’s important to carefully review each one.
| Plan | Features | Pricing |
|---|---|---|
| Basic | Access to core AWS services | Pay-as-you-go pricing |
| Developer | Additional tools for development and testing | Starting at $29/month |
| Business | Advanced security and monitoring features | Starting at $100/month |
| Enterprise | Customizable features and support options | Contact sales for pricing |
It’s important to consider your business needs and budget when choosing an AWS plan. If you’re just starting out, the Basic or Developer plan may be a good fit. For larger businesses with more advanced security needs, the Business or Enterprise plan may be a better option.
- Consider your business needs and budget when choosing an AWS plan.
- Check if you’re eligible for the Free Tier before choosing a plan.
- Compare the different AWS plans to determine which one is right for you.
By carefully considering your needs and comparing the different AWS plans, you can choose the right plan for your business and make the most of AWS’s powerful cloud computing services.

Credit: medium.com
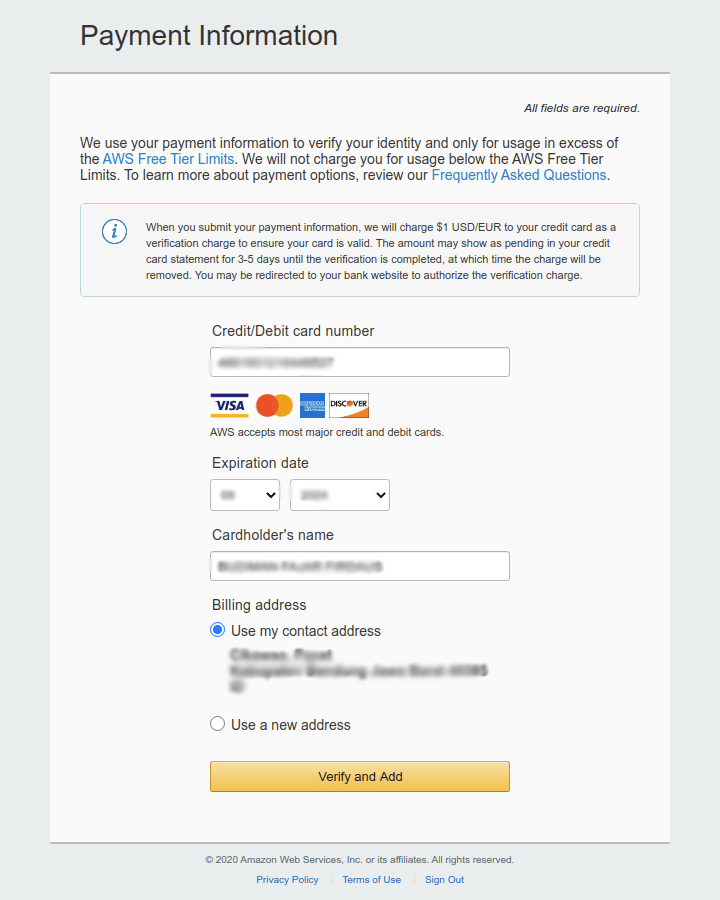
Credit Card Information And Verification
To create an AWS account with a credit card, follow these steps: visit the AWS website, click on “Create an AWS Account,” enter your account information, provide credit card details for verification, and submit the form. Once your credit card information is verified, you can start using AWS services and resources.
Entering Credit Card Details
Creating an AWS account requires a valid credit card to be linked to it. To enter your credit card details, navigate to the billing and cost management console and select the “Payment Methods” tab. Here, you can add your credit card information, including the card number, expiration date, and security code. Make sure to double-check that all the information is correct before proceeding.Understanding The Verification Process
After entering your credit card details, AWS will verify your card information by charging a small amount to your card. This charge is temporary and will be refunded to your account within a few days. The verification process helps to ensure that your account is secure and that only authorized individuals have access to it. To complete the verification process, you will need to locate the temporary charge on your credit card statement and enter the amount charged in the “Payment Method” section of your AWS account. Once this is done, your account will be fully verified, and you will be able to use all the features offered by AWS. In conclusion, creating an AWS account with a credit card is a straightforward process, but it is important to ensure that all the information entered is accurate and that the verification process is completed successfully. With these steps, you can create an AWS account and start exploring all the benefits that come with it.Setting Up Aws Budget Alerts
To create an AWS account with a credit card, follow these steps: go to the AWS home page, click “create an AWS account,” and enter your account information. Once your account is set up, you can create AWS budget alerts to monitor your spending and avoid unexpected charges.
When it comes to managing your AWS spending, setting up budget alerts is an essential step. By creating a budget and configuring alerts for spending, you can stay on top of your expenses and avoid any unexpected surprises. In this section, we will guide you through the process of creating a budget and setting up alerts for spending in your AWS account.
Creating A Budget
To create a budget in your AWS account, follow these simple steps:
- Sign in to your AWS Management Console.
- Navigate to the AWS Budgets page.
- Click on “Create budget” to start the budget creation process.
- Choose a budget type that suits your needs, such as Cost, Usage, or Reservation.
- Select the desired time period for your budget, whether it’s monthly, quarterly, or annually.
- Specify the budget amount, which can be an absolute value or a percentage of your total costs.
- Set up your budget thresholds and actions, such as triggering an alert when your spending exceeds a certain amount.
- Review and confirm your budget details, ensuring everything is accurate.
- Click on “Create” to finalize the budget creation process.
By following these steps, you can easily create a budget that aligns with your financial goals and helps you monitor your AWS spending effectively.
Configuring Alerts For Spending
After creating a budget, the next step is to configure alerts for spending. This allows you to receive notifications when your spending exceeds certain thresholds. Here’s how you can set up spending alerts:
- Go to the AWS Budgets page in your AWS Management Console.
- Select the budget for which you want to configure alerts.
- Click on the “Alerts” tab.
- Choose the type of alert you want to configure, such as Actual, Forecasted, or Budgeted.
- Specify the threshold amount for the alert.
- Choose the recipients who will receive the alert notifications.
- Configure the frequency of the alerts, whether you want to receive them daily, weekly, or monthly.
- Review and confirm your alert settings.
- Click on “Save” to enable the spending alerts.
By configuring alerts for spending, you can proactively monitor your AWS costs and take necessary actions to control your expenses. This ensures that you stay within your budget and avoid any financial surprises.
Security Measures For Your Aws Account
Ensuring the security of your AWS account is paramount to safeguard your data and resources. By implementing the following measures, you can enhance the protection of your account from unauthorized access and potential threats.
Activating Multi-factor Authentication (mfa)
Multi-Factor Authentication (MFA) adds an extra layer of security by requiring users to provide two or more forms of verification before accessing their accounts.
Creating Iam Users And Roles
IAM Users and Roles allow you to control who can access your AWS resources and what actions they can perform. By setting up specific permissions, you can limit potential security risks.
Exploring Aws Dashboard And Services
The AWS dashboard provides a comprehensive overview of the services available. To create an AWS account with a credit card, simply follow the step-by-step instructions provided and explore the various services available to you.
Familiarizing With The Aws Management Console
Access AWS Management Console using your login credentials.
Explore various services listed on the dashboard.
Locate service categories like Compute, Storage, and Database.
Launching Your First Aws Service
Click on desired service to launch it.
Follow prompts to configure and set up the service.
Start utilizing your selected AWS service immediately.
Managing Your Aws Account
To set up an AWS account with a credit card, go to the AWS Management Console and follow the prompts to create a new account. Enter your payment information, verify your identity, and you’re all set to start using AWS services.
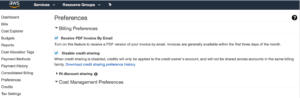
Updating Billing Information
To update billing information in your AWS account:
- Login to your AWS Management Console
- Go to the Billing and Cost Management Dashboard
- Select Payment Methods to update credit card details
Closing Your Aws Account
If you wish to close your AWS account:
- Ensure all resources are terminated
- Go to the Account Settings page
- Click “Close Account” and follow the instructions
Frequently Asked Questions
Can You Pay Aws With A Credit Card?
Yes, you can pay for AWS services using a credit card. Simply add your credit card information to your AWS account, and you can use it to pay for the services you use.
Do You Need A Credit Card To Create An Aws Account?
Yes, a credit card is required to create an AWS account. It is used for billing purposes and to verify your identity.
Can I Create Another Aws Account With Same Credit Card?
Yes, you can create another AWS account using the same credit card. There is no restriction on using the same credit card for multiple accounts.
How To Create A Virtual Credit Card For An Aws Account?
To create a virtual credit card for your AWS account, use a virtual card provider. Enter card details in your AWS billing settings.
Conclusion
To sum up, creating an AWS account with a credit card is a simple and straightforward process. By following the steps outlined in this guide, you can set up your account quickly and start leveraging the powerful features and services offered by AWS.
Remember to keep your credit card information secure and regularly monitor your account for any unauthorized activity. With your AWS account up and running, you are now ready to explore the world of cloud computing and unlock the full potential of your business.