To add a credit card to AWS, navigate to the AWS Management Console and go to the Billing and Cost Management page. From there, click on the Payment Methods tab and select “Add a card” to enter your credit card details.
Adding a credit card to AWS is a simple process that allows you to easily manage your billing and payments for the various services provided by Amazon Web Services. By following a few straightforward steps, you can ensure a smooth and hassle-free experience when it comes to managing your AWS account.
We will guide you through the process of adding a credit card to AWS, providing you with the necessary information to get started quickly and efficiently. Whether you are an individual or a business, having a valid credit card on file is essential for accessing and utilizing the vast range of services offered by AWS. So, let’s dive in and learn how to add a credit card to AWS.
Introduction To Aws Payment Methods
To set up payment in AWS, navigate to the Billing and Cost Management dashboard. Click on Payment Methods and select Add a Credit Card. Enter the card details and billing address to complete the process swiftly.
The Importance Of A Secure Payment Setup
Ensuring your payment setup is secure is crucial.
Prevent unauthorized access to your AWS account.
Protect sensitive financial information from potential breaches.
Supported Credit Cards On Aws
Major credit cards are accepted on AWS:
- Visa
- Mastercard
- American Express
- Discover

Credit: webapps.stackexchange.com
Preparing To Add A Credit Card
To add a credit card to AWS, start by logging into your AWS Management Console. Navigate to the Billing and Cost Management dashboard and select “Payment Methods. ” Click on “Add a card,” enter the card details, and save to complete the process.
Verifying Account Details
Before adding a credit card to your AWS account, it is important to verify that your account information is accurate and up-to-date. This includes your name, address, and contact information. You can do this by logging into your AWS account and navigating to the “My Account” page. From there, you can review and update your account information as needed.Ensuring Card Eligibility
Not all credit cards are eligible for use with AWS. Before adding a credit card to your account, it is important to ensure that the card is eligible for use. AWS accepts most major credit cards, including Visa, Mastercard, American Express, and Discover. However, some prepaid and virtual credit cards may not be accepted. To ensure that your card is eligible, check the terms and conditions of your credit card or contact your credit card provider.Adding A Credit Card To Aws
Once you have verified your account details and confirmed that your credit card is eligible for use with AWS, you can add your card to your account. To do this, log into your AWS account and navigate to the “Billing and Cost Management” page. From there, click on the “Payment Methods” tab and select “Add a Payment Method.” Follow the prompts to enter your credit card information and complete the process. By following these steps, you can easily add a credit card to your AWS account. Remember to always verify your account details and ensure that your credit card is eligible for use before adding it to your account.Navigating The Aws Management Console
When it comes to managing your AWS account, adding a credit card is a crucial step. Navigating the AWS Management Console to add a credit card is a straightforward process that involves accessing the billing dashboard and understanding the user interface.
Accessing The Billing Dashboard
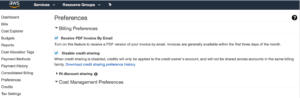
Once logged into your AWS account, navigate to the AWS Management Console. From the services dropdown menu, select “Billing & Cost Management.” This will take you to the billing dashboard where you can manage payment methods and add a new credit card.
Understanding The User Interface
The billing dashboard provides a user-friendly interface to manage payment methods. You can easily add a new credit card by selecting the “Payment Methods” tab and clicking on “Add a card.” Follow the prompts to enter your credit card details and save the information securely to your account.

Credit: aws.amazon.com
Step-by-step: Adding Your Credit Card
Adding a credit card to your AWS account is a straightforward process that requires only a few simple steps. In this guide, we will walk you through the process of adding your credit card details to AWS, setting it as your default payment method, and ensuring that your account remains up-to-date.
Entering Card Information
The first step to adding your credit card to AWS is to log in to your account and navigate to the Billing and Cost Management Dashboard. Once you are on the dashboard, click on the “Payment Methods” tab, and then click on the “Add a Payment Method” button. This will take you to a page where you can enter your credit card details.
On the payment method page, you will need to enter the following details:
- Name on Card
- Card Number
- Expiration Date
- Credit Card Security Code
- Billing Address
Once you have entered all the required details, click on the “Add Payment Method” button. Your credit card will now be added to your AWS account.
Setting As Default Payment Method
After you have added your credit card to your AWS account, you will need to set it as your default payment method. To do this, go to the Payment Methods tab on the Billing and Cost Management Dashboard and select the credit card you just added. Click on the “Make Default” button to set it as your default payment method.
It is important to ensure that you have a default payment method set up, as this ensures that your account remains up-to-date and that you do not experience any service interruptions.
That’s it! You have now successfully added your credit card to your AWS account and set it as your default payment method. If you have any issues or questions, please don’t hesitate to contact AWS support for assistance.
Verification Process
To add a credit card to AWS, you will need to go through a verification process. This involves entering your credit card details and confirming the verification code sent to your card. Once the process is complete, your card will be successfully added to your AWS account.
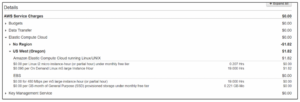
Aws Verification Charges
When adding a credit card to your AWS account, the verification process is an essential step to ensure the security and validity of your payment method. AWS verification charges help confirm the ownership of the credit card and prevent fraudulent activities. These charges, typically small and temporary, serve as a means of verifying the card’s information and are later refunded to your account. To initiate the verification process, AWS will charge a nominal amount, usually less than a dollar, to your credit card. This charge will appear on your credit card statement along with a unique code. The purpose of this charge is to validate the card’s authenticity and ensure that the billing information provided matches the card details.Confirming Card Addition With Your Bank
After the verification charge appears on your credit card statement, the next step is to confirm the card addition with your bank. This additional layer of security ensures that you have authorized the transaction and helps prevent unauthorized access to your AWS account. To confirm the card addition, you can either contact your bank’s customer service or use their online banking portal. Provide them with the transaction details, including the unique code associated with the verification charge. Your bank will then verify the charge and confirm the addition of your credit card to your AWS account. It is crucial to complete this step promptly to avoid any delays in using your AWS services. Once the card addition is confirmed by your bank, you can proceed with utilizing AWS resources and making payments using the verified credit card. Remember that the verification process may slightly vary depending on your bank’s policies and procedures. However, by following these steps and ensuring timely confirmation, you can successfully add and verify your credit card on AWS, providing you with a secure and convenient payment method for your cloud services. In summary, the verification process for adding a credit card to AWS involves AWS verification charges and confirming the card addition with your bank. These steps help ensure the security and validity of your payment method, allowing you to use AWS services with ease and peace of mind.Managing Multiple Payment Methods
When managing multiple payment methods on AWS, it’s essential to prioritize payment options and remove outdated credit cards to ensure smooth and efficient billing processes.
Prioritizing Payment Options
When adding multiple credit cards to your AWS account, it’s crucial to establish a priority order for payment methods. By setting a primary and backup payment method, you can avoid service interruptions and ensure seamless transactions.
Removing Outdated Credit Cards
Regularly reviewing and updating your payment methods is vital to maintain accurate billing information. Removing outdated credit cards from your AWS account helps prevent billing errors and ensures that only valid payment methods are associated with your account.
Security Measures For Payment Information
When adding a credit card to AWS, ensuring security measures for payment information is paramount.
Aws Encryption And Compliance
AWS provides encryption for safeguarding payment details and adheres to compliance standards.
Monitoring And Alerts Setup
Set up monitoring and alerts to track any suspicious activities or unauthorized access.

Credit: aws.amazon.com
Troubleshooting Common Issues
Having trouble adding a credit card to AWS? Follow these simple steps to troubleshoot common issues and successfully add your credit card to your AWS account. Avoid the hassle and get started with AWS smoothly.
Dealing With Declined Transactions
Updating Expired Credit Card Details
Troubleshooting Common Issues Facing declined transactions? Double-check card details. Try another card, ensure sufficient balance. Stuck with an expired card? Update details promptly. Access AWS Billing Dashboard, select Payment Methods. For declined transactions, verify card details, try different card with sufficient balance. To update expired card details, access AWS Billing Dashboard and select Payment Methods.Frequently Asked Questions
How Do I Add A Credit Card To My Aws Console?
To add a credit card to your AWS console, follow these steps: 1. Log in to your AWS account. 2. Click on your name in the top right corner and select “My Account”. 3. Click on “Payment Methods” and then “Add Payment Method”.
4. Enter your credit card information and click “Add Payment Method”. 5. Verify your credit card by entering the verification code and you’re done.
How Do I Add A New Credit Card To Amazon?
To add a new credit card to Amazon, go to “Your Account” and select “Payment options. ” Then click on “Add a card” and enter the card details.
How To Update Payment Info In Aws?
To update your payment info in AWS, follow these steps: 1. Log in to your AWS account. 2. Go to the “Billing and Cost Management” page. 3. Click on “Payment Methods” and select the payment method you want to update.
4. Enter the new payment information and click “Save”. 5. Verify your new payment method by checking your email or bank statement.
Does Aws Accept Credit Cards?
Yes, AWS accepts credit cards for payment. Simply add your credit card details to your account.
Conclusion
To sum up, adding a credit card to AWS is a simple and essential process for managing your account and enabling smooth transactions. By following the step-by-step guide provided in this blog post, you can easily navigate through the AWS console and securely add your credit card details.
Remember to keep your information confidential and regularly update your payment methods to ensure uninterrupted access to AWS services. Happy cloud computing!