To check your AWS burst credits, navigate to the EC2 dashboard and select the instance you want to monitor. In the monitoring tab, you will find the CPU credit metrics, which will indicate the amount of burst credits remaining for your instance.
Checking your AWS burst credits is essential to ensure optimal performance and prevent unexpected downtime. Burst credits are a feature of Amazon EC2 instances that allow them to perform above their baseline performance for a limited duration. Monitoring your burst credits helps you manage your instance’s resource utilization effectively.
In this blog post, we will discuss the steps to check your AWS burst credits and understand their significance in maintaining your instance’s performance. By following these simple procedures, you can ensure that your instances are operating efficiently and avoid any potential performance issues. Let’s dive in and explore how to check your AWS burst credits.
Introduction To Aws Burst Credits
Burst credits are a key aspect of managing performance in AWS instances. Understanding the concept of burst credits and their importance for performance management is crucial for optimizing your AWS resources effectively.
Concept Of Burst Credits
Burst credits are like a currency in AWS that allows instances to temporarily burst beyond their baseline performance levels when needed.
Instances accumulate burst credits when they operate below their baseline performance, which can then be used when the workload demands a performance boost.
Importance For Performance Management
Proper management of burst credits ensures that your instances can handle sudden spikes in workload without compromising performance.
Monitoring and optimizing burst credits help in maintaining consistent performance levels and preventing instances from being throttled due to exceeding their baseline limits.
Aws Services Utilizing Burst Credits
When using AWS, understanding how to check your Burst Credits is important to avoid unexpected charges and service interruptions. Burst Credits are a feature of AWS that allow for short-term bursts of CPU usage above the baseline level. AWS offers several services that utilize Burst Credits, including Amazon EC2 Instances and Amazon RDS Instances.
Amazon Ec2 Instances
Amazon EC2 Instances are virtual machines that can be configured with a wide range of specifications. When using EC2 Instances, it is important to understand how Burst Credits are used. EC2 Instances use Burst Credits to allow for short-term bursts of CPU usage above the baseline level. If you exceed your Burst Credit balance, your instance will be throttled, which can result in degraded performance.
To check your Burst Credit balance for an EC2 instance, you can use the AWS Management Console or the AWS CLI. In the Management Console, navigate to the EC2 Instances page, select the instance you want to check, and view the Burst Balance metric in the Monitoring tab. In the AWS CLI, you can use the describe-instances command to view the BurstCreditBalance metric.
Amazon Rds Instances
Amazon RDS Instances are managed relational databases that can be configured with a wide range of specifications. When using RDS Instances, it is important to understand how Burst Credits are used. RDS Instances use Burst Credits to allow for short-term bursts of CPU usage above the baseline level. If you exceed your Burst Credit balance, your instance will be throttled, which can result in degraded performance.
To check your Burst Credit balance for an RDS instance, you can use the AWS Management Console or the AWS CLI. In the Management Console, navigate to the RDS Instances page, select the instance you want to check, and view the Burst Balance metric in the Monitoring tab. In the AWS CLI, you can use the describe-db-instances command to view the BurstCreditBalance metric.
Understanding Burst Credit Metrics
To monitor your AWS burst credits, access the CloudWatch console and select the EC2 metrics tab. Locate the “BurstCreditBalance” metric to track your usage and ensure efficient resource management. This simple step helps optimize performance and prevent unexpected credit depletion.
Understanding Burst Credit Metrics Burst credit metrics play a crucial role in optimizing the performance and cost-effectiveness of AWS resources. By grasping the concept of burst credits and effectively monitoring them, you can ensure the efficient utilization of your AWS instances and volumes. CPU Credits for T2 and T3 Instances T2 and T3 instances are designed to provide baseline performance with the ability to burst above the baseline when required. The CPU credit system governs the bursting behavior of these instances. When the CPU utilization of a T2 or T3 instance remains below the baseline, it earns CPU credits, which can then be utilized for bursting when the workload demands exceed the baseline performance level. IO Credits for gp2 Volumes In the case of gp2 volumes, the IO credit system regulates the ability to burst I/O operations. These volumes receive an initial credit balance and accumulate credits over time, which can be utilized for burst operations. The credit balance and the rate of accumulation are influenced by the volume size, with larger volumes having higher credit balances and faster credit accumulation rates. By understanding and effectively managing burst credit metrics, you can ensure the optimal performance and cost-efficiency of your AWS resources.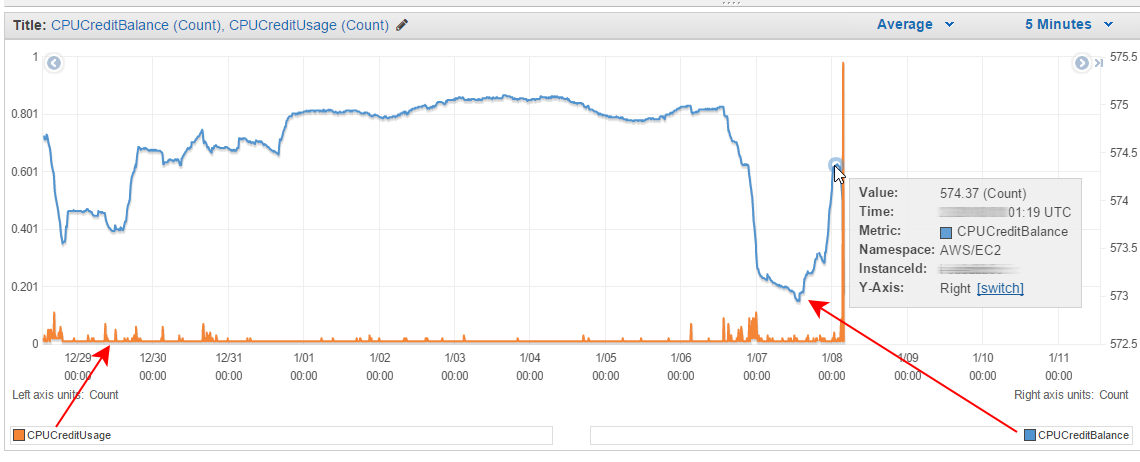
Credit: www.cloudinsidr.com
Monitoring Burst Credits Via Aws Console
To check your AWS burst credits, navigate to the AWS Management Console and select the EC2 Dashboard. From there, click on “Instances” and then choose the instance you want to monitor. In the instance details, locate the “Credit Specification” section to view your burst credit balance.
This simple process allows you to keep track of your burst credits and ensure optimal performance for your AWS instance.
If you are using EC2 instances that require high CPU usage, then monitoring your AWS burst credits is essential. When your instance uses up its CPU credits, it may start performing poorly, which may affect your application’s performance. In this guide, we’ll show you how to monitor your AWS burst credits via the AWS console, and keep track of your EC2 instances’ performance.Navigating The Ec2 Dashboard
To monitor your EC2 instances’ performance, you need to navigate to the EC2 dashboard on your AWS console. From the dashboard, you can view your running instances, their status, and their CPU usage. Here’s how you can do it:- Login to your AWS console and navigate to the EC2 dashboard
- Click on the “Instances” tab to view all your running instances
- Select the instance you want to monitor
- On the bottom pane, you can see the CPU usage, including burst credits and CPU credit balance
Utilizing Cloudwatch For Metrics
In addition to the EC2 dashboard, you can also use CloudWatch to monitor your EC2 instances’ performance. CloudWatch is a monitoring service that provides data and insights into your AWS resources’ performance. Here’s how you can utilize CloudWatch for metrics:- Login to your AWS console and navigate to the CloudWatch dashboard
- Select the “Metrics” tab from the left-hand navigation menu
- Choose the “EC2” category
- Select the metric you want to monitor, such as “CPUCreditBalance” or “CPUCreditUsage”
- Set up alarms to receive notifications when your instance’s CPU usage goes over or under a certain threshold
Setting Up Cloudwatch Alarms
When it comes to monitoring your AWS burst credits, setting up CloudWatch alarms is a crucial step. CloudWatch alarms allow you to track the credit balance of your burstable performance instances and receive notifications when the credits are running low. This ensures that you can take timely action to prevent performance degradation or unexpected interruptions.
Creating Alarms For Credit Balance
To create alarms for credit balance, follow these simple steps:
- Sign in to the AWS Management Console and open the CloudWatch console.
- Select the region where your burstable performance instances are located.
- In the left navigation pane, click on “Alarms” and then click on “Create Alarm”.
- Under “Create Alarm”, select the metric namespace “EC2” and the metric name “CPUCreditBalance”.
- Specify the conditions for the alarm. For example, you can set the threshold to a specific value or a percentage of your burst credit balance.
- Choose the actions to perform when the alarm state is triggered. This can include sending notifications via Amazon SNS or executing an AWS Lambda function.
- Review the alarm configuration and click on “Create Alarm” to save it.
By creating alarms for credit balance, you can proactively monitor your burstable performance instances and receive alerts when the credit balance reaches a certain threshold. This enables you to optimize your workload and prevent any potential performance issues.
Configuring Notification For Credit Depletion
In addition to creating alarms, it is important to configure notifications for credit depletion. This ensures that you are immediately notified when your burst credits are fully consumed, allowing you to take necessary actions to avoid any disruptions.
To configure notifications for credit depletion, follow these steps:
- Open the CloudWatch console and select the region where your burstable performance instances are located.
- In the left navigation pane, click on “Alarms” and select the alarm you created for credit balance.
- Under “Actions”, click on “Add notification” and select the desired notification method, such as Amazon SNS.
- Provide the necessary details for the notification, including the topic or endpoint to send the notifications to.
- Save the notification configuration.
Configuring notification for credit depletion ensures that you receive timely alerts when your burst credits are exhausted. This allows you to take appropriate measures, such as scaling your instances or adjusting your workload, to ensure uninterrupted performance.
Interpreting Your Burst Credit Balance
Analyzing Spend Versus Performance
When analyzing your AWS burst credit balance, it’s important to consider the relationship between your spend and the performance of your instances. Look for patterns in your credit usage and the impact on your application’s performance.
Identifying Trends In Usage
Identifying trends in your burst credit usage can provide valuable insights into your application’s resource demands. By tracking usage patterns, you can optimize your instance types and sizes to maximize burst credit efficiency.
Best Practices For Managing Burst Credits
Managing burst credits in AWS requires careful monitoring to ensure optimal performance. To check your AWS burst credits, navigate to the EC2 dashboard and select the instance. From there, locate the “CPU Credit Usage” graph, which provides a visual representation of your burst credit usage.
By regularly checking this metric, you can effectively manage your burst credits and avoid performance issues.
Sizing Your Instances Correctly
Choose instance types that match your workload for optimal credit utilization.
Optimizing Workloads For Credit Usage
Adjust workloads to avoid unnecessary credit consumption.
Credit: aws.amazon.com
Troubleshooting Common Issues
Learn how to troubleshoot common issues with checking your AWS burst credits. Follow these simple steps to ensure you have enough credits for your workload: navigate to the EC2 console, select the instance you want to check, and monitor the CPU credit balance.
Depleted Burst Credits
If you notice a sudden drop in performance, check your burst credits.
Depleted burst credits can cause a decrease in instance performance.
Unexpected Charges
Monitor your AWS billing statements regularly to catch unexpected charges.
Unexpected charges may indicate issues with your burst credit utilization.
Conclusion And Further Resources
Discover how to check your AWS burst credits and optimize your usage. Explore further resources to maximize your AWS burst credits and ensure efficient cloud computing management.
Summarizing Key Takeaways
AWS burst credits are crucial for optimizing performance and cost efficiency. Monitoring burst credits ensures efficient utilization of resources. Utilize CloudWatch metrics to track burst credits accurately.Advanced Tools And Techniques
Leverage CloudWatch Alarms to receive notifications on burst credit consumption. Implement AWS Budgets for proactive cost management strategies. Explore AWS Trusted Advisor for additional optimization recommendations.
Credit: stackoverflow.com
Frequently Asked Questions
How Do I Check My Cpu Credits On Ec2?
To check CPU credits on EC2, go to the EC2 dashboard in the AWS Management Console. Select the instance and click on the “Monitoring” tab. Look for the “CPU Credit Usage” metric graph to see your CPU credit usage. Alternatively, you can use the AWS CLI or SDKs to retrieve the CPU credit metrics programmatically.
What Happens When I Run Out Of Cpu Credits?
When you run out of CPU credits, your website may slow down or become temporarily unavailable. Regular usage will resume once credits are replenished.
What Is Cpu Credit Balance In Aws Rds?
CPU credit balance in AWS RDS refers to the available CPU credits for burstable performance instances. It determines the amount of processing power that can be used before performance is impacted. When the balance is low, the instance may experience reduced performance.
What Is Cpu Burst Capacity?
CPU burst capacity refers to the maximum amount of processing power that a CPU can handle in a given period. It determines how many tasks or instructions the CPU can execute efficiently. This capacity is crucial for maintaining smooth performance and handling sudden spikes in workload.
Conclusion
Monitoring your AWS burst credits is crucial for optimizing your resource usage and avoiding unexpected performance issues. By following the steps outlined in this guide, you can easily check your burst credits and ensure that your applications and workloads are running smoothly.
Stay proactive in managing your AWS burst credits to make the most of your resources and keep your systems running efficiently.